Create a new task
This guide will show you how to create a task and schedule staff for that task so that it appears both on the schedule and on the individuals’ diaries.
Note: Kompass form field labels can be customised for different Kompass instances. Therefore, it is likely that some fields will be named differently in your version of Kompass.
From Sales Tab
The fastest and safest way to create tasks is via the "Sales" tab. When a proposal item is accepted, you can easily create tasks so that you will schedule your employees. Select the proposal items (1) and click "Actions" (2), and "Create Tasks" (3).

Note: you can only create tasks from already accepted proposal items. Also, as can be seen above, Monitoring is the parent proposal item and Topographic Survey is the child proposal item (indented). To find out more about proposal items, check here: Proposal Items.
In the new window, you can select whether you want to create separate tasks for staff resources saved under that proposal item and prefixing the parent name to child task. When ready, click "Create".

As can be seen, in this instance, we have decided to create separate tasks and prefix the parent therefore:
- "Monitoring" is prefixed to the task name (green)
- one task is for SES-Junior Engineer while the other is for SES-Senior Engineer (red)

From Operations Tab
Even though a new task can be created from the Operations tab, we would suggest creating them from the Sales tab as seen above. However, some users might not have access on Sales tab. In that case, you can ask your manager to quickly create the tasks for you. If that is not possible, follow the instructions below.
- Go to a Project.
-
Click on the Operations tab and then on "Create" in the Tasks section :

Note: The Operations tab is only accessible in Projects, not in Quotes.
-
Fill out the form for the task:
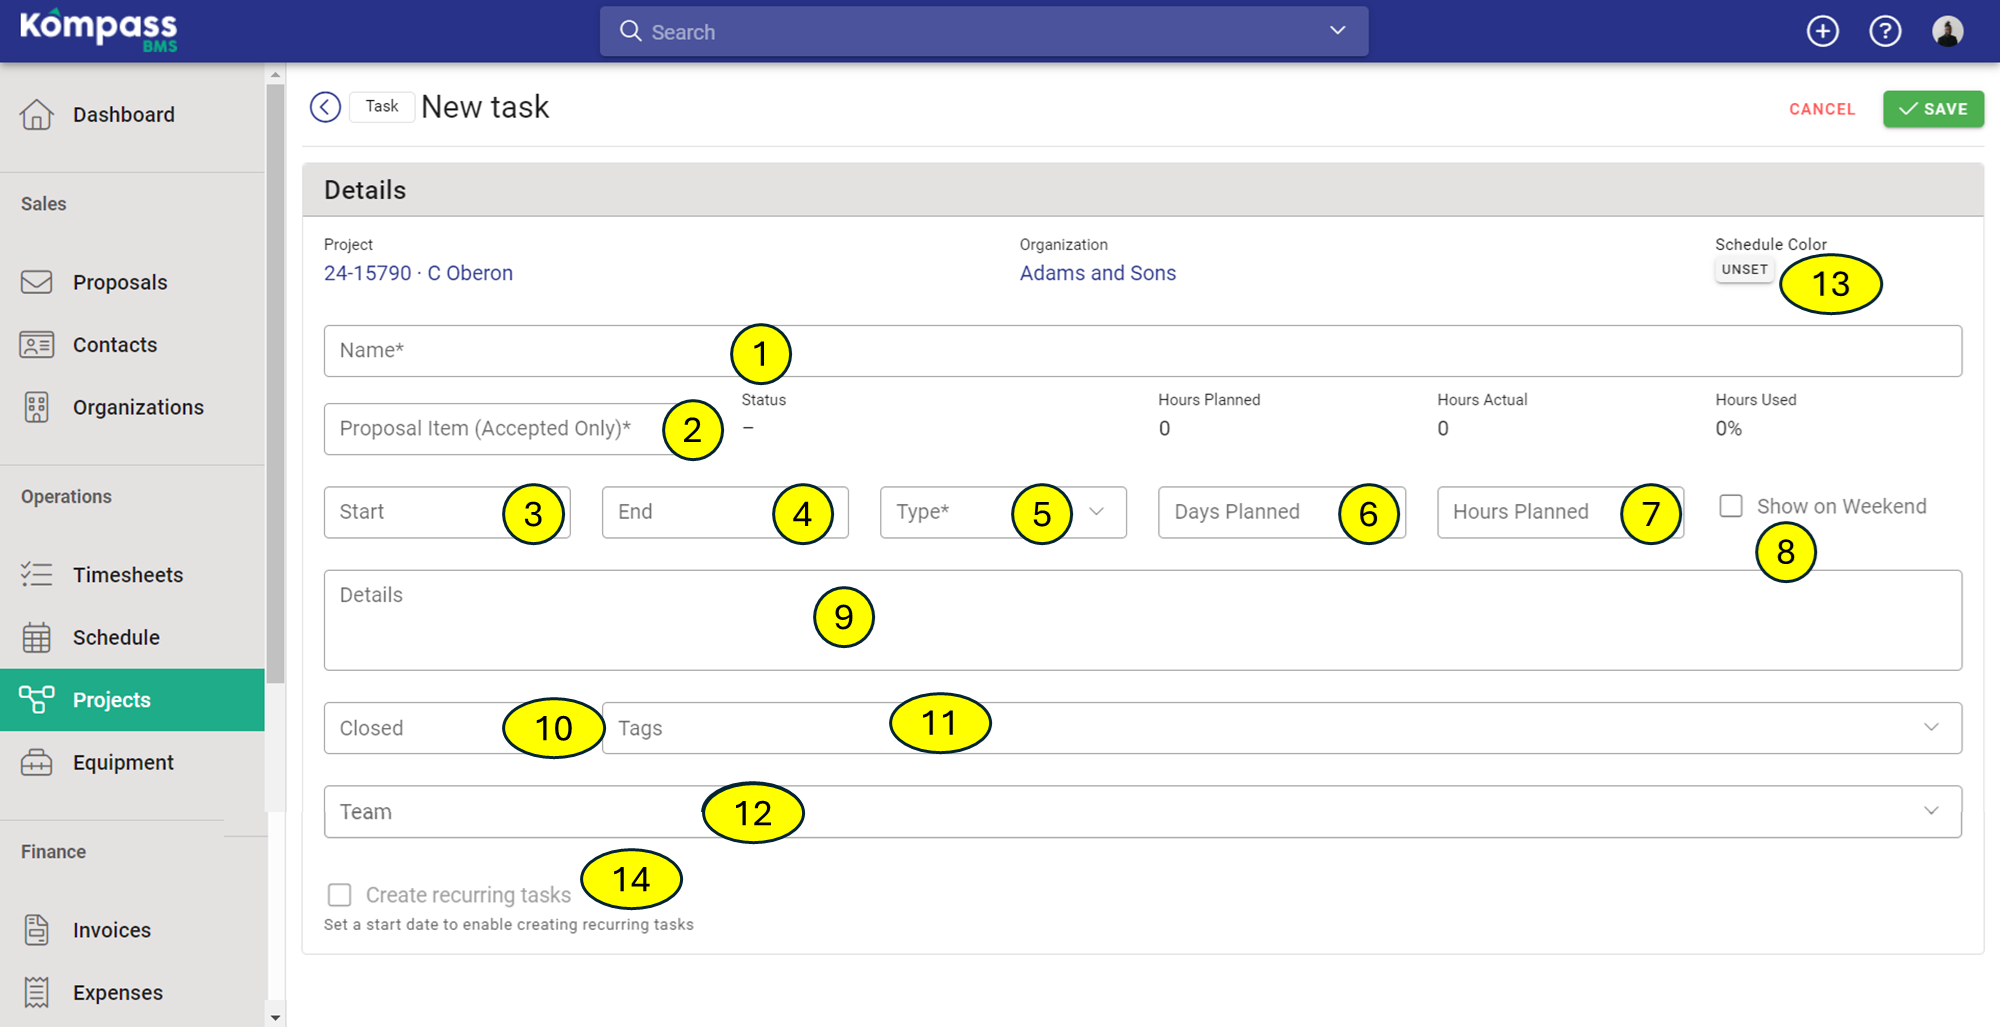


| a/a | Field | Description |
|
|
Project [read-only] | The project that this task will be linked to. |
|
|
Client [read-only] | The project Client. |
| 1 | Name [required] | Enter a descriptive title for the task. This will be used in the schedule and timesheets pages. |
| 2 | Proposal Item [required] | Every task must be linked to a proposal item. Choose one of the existing proposal items of the project. |
|
|
Status [read-only] | Latest recorded Status of this proposal item. |
|
|
Hours Planned [read-only] | The budgeted hours for this proposal item. |
|
|
Hours Actual [read-only] | The actual hours that have been recorded against this proposal item so far. |
|
|
Hours Used [read-only] | Percentage of actual vs budgeted hours. |
| 3 | Start | Start date of the task. |
| 4 | End | End date of the task |
| 5 | Type [required] | The type of task. This will link to the budgeted hours of the proposal item. |
| 6 | Days Planned | How many days are budgeted for this task. This serves as communication to those working on the task. Note: This is not directly linked to the Start and End dates, i.e., it can have a different duration. |
| 7 | Hours Planned | How many hours are budgeted for this task. Note: This is not directly linked to the Start and End dates, i.e., it can be a different amount. |
| 8 | Show on Weekend | If enabled, this task will show also appear on weekends or vacations in the schedule. If disabled, it will only show on normal working days, i.e., Monday to Friday. |
| 9 | Details | Description of the work that needs to be done in this task. |
| 10 | Closed | In cases that you don't want these tasks to be available for users to record their time after a certain date, you can select that date here. |
| 11 | Tags | Searchable tags can be attached to the task. |
| 12 | Team | Select all individuals who are scheduled to work on this task. Note: This will be valid for the whole period Start-End and currently cannot be limited to only some days within the tasks duration. |
| 13 | Schedule Color | Even though Kompass will automatically assign a color to the task when appearing on schedule, user can set their own color as a way to quickly communicate their own set messages. |
| 14 | Create recurring tasks | Gives you the ability to create recurring tasks. See below for further details. |
- Click "Save" once complete and the task will appear in the Task list of the Project:

- The Task will now appear in the Schedule and Diary of the scheduled persons:
Schedule
For creating tasks via the schedule, please see article How-to Guides, Schedule, Creating Tasks from Schedule.
Recurring tasks
It is common for your teams to have to periodically visit a specific project. If this is the case, you will need to create multiple tasks for certain employees so that they know they are booked in the future. To do this, you will have to set recurring tasks by ticking the box as shown above (mark 14).

You have the following options:
- Set how frequently you need to repeat the task. You can set intervals by day, week, or month.
- If you select a weekly interval, you can choose the dates you want the task to repeat. Please note that if you set your task to show on the weekend, then Saturday and Sunday will also appear.
- Set an end date either with a count of occurrences or a specific end date.
- Preview the tasks that will be created.
Notes:
- You can only create recurring tasks from the operations tab of your project. You cannot create recurring tasks from the sales tab of your project or from the schedule.
- You must add a start date to activate the recurring task tick box.
- If a weekly task recurrence pattern has a start date (for example, Friday 22 Aug) but the set week days are different from the start date (for example, Tuesday & Thursday, i.e. not Friday), then the first date created will be on the next matching week day, i.e. Tuesday in our example.
- If a "monthly" recurrence pattern has an end date that doesn't exist in all months, for example 31 July (31 Sep doesn't exist, 31 Nov doesn't exist), then the dates for those months will be moved to the nearest end date, for example 30 Sep or 30 Nov.
- If the task does not have weekend work enabled and the date falls on a weekend, for example 31 Aug 2025, then the previous Friday will be used, i.e. 29 August.