
QuickBooks Desktop
Overview
This article explains how to connect your Kompass account to QuickBooks Desktop for automatic syncing of clients, projects, invoices, timesheets and payments. Only admin users can set up and manage the QuickBooks Desktop connection.
QuickBooks Desktop has no cloud API, so the connection works differently from QuickBooks Online or Xero: a small Intuit utility called the QuickBooks Web Connector runs on the Windows machine that hosts QuickBooks and securely polls for changes on a schedule you choose. Kompass sends changes through our integration partner Conductor, and the Web Connector applies them to your company file the next time it checks in. This means the sync is near real-time: changes typically appear in QuickBooks within a few minutes, depending on the polling schedule.
Most of the sync pushes from Kompass to QuickBooks. Payments are the exception: they are pulled the other way, from QuickBooks into Kompass, and are covered in Step 8.
The integration supports QuickBooks Desktop Pro, Premier, and Enterprise on Windows. QuickBooks Online is covered by a separate article. If your QuickBooks Desktop is hosted in the cloud (for example with Rightworks), contact Kompass support before starting.
Prerequisites
- QuickBooks Desktop installed on a Windows machine, with admin access to the company file you wish to connect
- Access to that machine during setup (the Web Connector handshake happens there)
- Admin access to your Kompass account
- The QuickBooks Desktop permission group on your user. If you do not see a QuickBooks Desktop group in the Admin site, contact Kompass support to have the permissions added to your account.
Step 1: Create a QuickBooks Desktop Configuration
- Navigate to the Admin site by adding /admin after your Kompass URL (e.g. your-server.kompassbms.com/admin).
- Under the QuickBooks Desktop group, select Configurations.
- Click Add in the top right to create a new configuration.
- Select the Kompass organisation to link to this QuickBooks company file.
- Add at least one email address under Notification recipients. This is required before connecting, and sync error notifications will be sent there. Untick "Invoices" from sync modules.
- Click Save. Leave the Enable checkbox unticked for now; you will enable the sync in Step 5 once existing customers have been reconciled.
Step 2: Connect via the QuickBooks Web Connector
- On the Configurations list page, select the configuration you just created using the tick-box.
- From the Action drop-down menu, select Connect to QuickBooks Desktop via Conductor and click Go.
- You will be redirected to a guided setup page. Complete this page on the Windows machine that runs QuickBooks; if you are not at that machine, copy the link and open it there.
- Follow the on-screen steps: install the QuickBooks Web Connector if it is not already present, download the connection file (a small .qwc file), open it in the Web Connector, and enter the password shown on the setup page.
- QuickBooks will ask you to authorise the connection. Have the company file open and be signed in as the QuickBooks admin user, and allow access even when QuickBooks is not running when prompted.
- In the Web Connector, tick Auto-Run for the new entry and set the polling interval (every 5 to 15 minutes works well for most companies).
The setup link is valid for 24 hours. If it expires before the handshake is completed, run the Connect action again to generate a fresh link.
Step 3: Confirm the Connection
- Back in the Kompass Admin, select the configuration again.
- From the Action drop-down, select Refresh QBD connection ID from Conductor and click Go. This picks up the connection created by the Web Connector handshake and stores it on the configuration. If it reports that no connection exists yet, the handshake has not completed; finish Step 2 first.
- Run the Check QBD connection health action to confirm QuickBooks is reachable. The Last seen at field on the configuration shows when the Web Connector last checked in.
Step 4: Bring Existing Data Together
Stop here if the company file already contains customers. Enabling the sync at this point could create duplicate customers in QuickBooks alongside your existing ones. Reconcile customers first, then enable the sync.
Which route you take depends on where your data already lives:
- Kompass already holds your clients and projects, and QuickBooks holds the matching customers. Use compare and link (Option A). It creates no new records, it only pairs up the two sides.
- QuickBooks is the source of truth and Kompass is empty or nearly empty. Use import from QuickBooks (Option B). It creates the Kompass records from your company file.
If both systems already hold data, use compare and link. Running the import into a populated Kompass duplicates everything you created by hand.
Option A: Compare and Link Existing Customers
To reconcile existing QuickBooks customers and jobs with Kompass clients and projects before enabling the sync:
- On the Configurations list page, select your configuration using the tick-box.
- From the Action drop-down, select Compare QBD customers with Kompass (email CSV) and click Go. Kompass fetches every customer and job from the company file (including inactive ones, since QuickBooks does not allow a new customer to reuse an inactive customer's name), matches them against your Kompass clients and projects by name, and emails a download link for a CSV report to the address on your user account. This typically takes a few minutes.
- Open the CSV. Each row shows a QuickBooks customer or job, a candidate Kompass match, and a confidence percentage. Top-level customers are matched against Kompass clients, jobs against Kompass projects.
- Review the matches and correct any that are wrong by editing the kompass_id column: enter the correct Kompass ID, or clear it where there is no true match. Rows with either side blank are simply skipped on import, so the reviewed file can be uploaded as-is.
- Return the reviewed CSV to Kompass support, who will import it to create the link records. (If you have API access, you can also upload it yourself to the qbd/customers/import/ endpoint.)
- You can re-run the comparison afterwards to confirm the remaining unmatched rows are only the records that genuinely exist on one side.
You can run the comparison as often as you like. Each run produces a fresh CSV; the download link in the email expires after 7 days.
Option B: Import from QuickBooks
If QuickBooks holds the data and Kompass does not yet, the configuration's Action menu can create the Kompass records for you and link them at the same time. Four actions are available:
- Import service items from QBD creates departments and services from your service item list. Top-level items become departments, items nested underneath them become services.
- Import customers from QBD creates clients and their contacts from top-level customers, and projects from the jobs beneath them.
- Import invoices from QBD creates invoices, along with the quote items their lines are billed against. Credit memos come across as credit notes.
- Import everything from QBD runs all three in the correct order.
Run them in that order if you run them individually. The invoice import needs the services and customers to be in place first, and will refuse to run without them.
Each action asks for confirmation before anything happens, and shows you what it is about to create and which organisation it will create it in. The invoice import also asks for a start date and a payment status: by default it brings across unpaid and partly paid invoices only, since reading a full invoice history over the Web Connector can take a long time. Widen the date to bring more across.
Imports run in the background and can take several minutes on a large company file. A report is emailed to you when each one finishes.
Do not run an import into a Kompass account that already holds clients and projects. There is no name matching: an import creates a second client for every one you already had. Use Option A instead.
Imported invoices carry their full value but no payment history. If you also want the settlements, turn on payment syncing (Step 8) and set the payment start date back to cover the period you imported.
Step 5: Configure Sync Settings and Enable
Once customer reconciliation is complete (or if the company file was empty to start with), configure the sync and enable it:
- Open the configuration and, under Sync modules, select the modules you wish to sync:
- Clients: syncs Kompass clients as QuickBooks customers
- Projects: syncs accepted Kompass projects as jobs (sub-customers) under the billing client's customer
- Invoices: syncs Kompass invoices as QuickBooks invoices, credit notes as credit memos, and journal invoices as journal entries
- Timesheets: syncs approved Kompass diary entries as QuickBooks time activities (see Step 7)
- Payments: pulls payments recorded in QuickBooks back into Kompass (see Step 8)
- Projects and Invoices both require Clients to be enabled, and Payments requires Invoices. Timesheets can be enabled on its own.
- Tick the Enable checkbox to activate the connection.
- Click Save.
Clients, Projects, Invoices and Timesheets are all pushes from Kompass to QuickBooks. Payments are the one pull, in the opposite direction.
Invoices sync when they are approved or posted and have the Sync checkbox ticked. Voiding a synced invoice in Kompass voids it in QuickBooks too. New customers are created in QuickBooks automatically when a project, invoice or billable timesheet entry that needs them syncs.
Step 6: Map Items, Sales Tax Codes and Employees
Mappings tell Kompass which QuickBooks record to use for each of its own. They are configured in the Admin under QuickBooks Desktop:
- Item (Department) Links and Item (Service) Links: map Kompass departments and services to QuickBooks service items. A service mapping is more specific than its department's, so it wins where both exist.
- Sales Tax Code (VAT Rate) Links: link Kompass VAT rates to QuickBooks sales tax codes.
- Employee (User) Links: link Kompass users to QuickBooks employees, for the timesheet sync. Only needed if you sync timesheets, and often not needed at all (see Step 7).
When you add a mapping, the QuickBooks side is a drop-down list read from your live company file, so there is nothing to look up or paste in. If the QuickBooks machine happens to be switched off, the list cannot be read and the field falls back to a free-text box.
Under Config, set a default item and a default sales tax code. These are the fallback for any invoice line whose service, department or VAT rate has no mapping of its own, and both are required before the Invoices module can be enabled. They are chosen from the same live drop-downs.
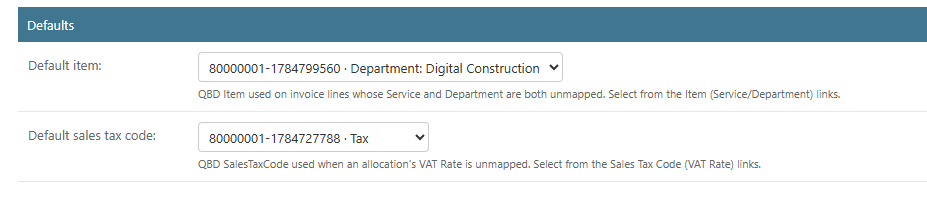
Kompass checks these mappings against your company file every night, and emails your notification recipients if one of them has been deleted in QuickBooks. Mappings flagged this way are shown in the Admin lists, so you can filter for anything that needs re-pointing. You can also run the check on demand with the Check QBD mappings still exist in QuickBooks action.
Step 7: Timesheets
With the Timesheets module on, an approved Kompass diary entry is pushed to QuickBooks as a time activity. Entries sync when they are approved; entries with no hours on them are skipped, as QuickBooks rejects them.
Each entry becomes one time activity, carrying the entry's total hours and marked billable when the task it was booked against is billable. Billable entries also carry the project's job and a service item, and the job is created in QuickBooks if it does not exist yet, exactly as it is for an invoice.
Matching people to QuickBooks employees
Time has to be attributed to a QuickBooks employee. Kompass matches the person on the entry to an employee by email address, and creates the link the first time it succeeds, so in most cases there is nothing to set up.
Employee email addresses are optional in QuickBooks and are often left blank. Where there is no email to match on, link the person by hand under Employee (User) Links. Until a person is matched, their entries do not sync and your notification recipients are emailed.
Payroll wage items
QuickBooks has a per-employee payroll setting called Use time data to create paychecks. An employee with it switched on can only receive time that names a payroll wage item (Regular Pay, Overtime Pay, and so on), and QuickBooks rejects their time without one. An employee with it switched off is the opposite case: QuickBooks rejects their time if a wage item is sent.
Kompass works out which employees need one from QuickBooks itself. The first time an employee's time is rejected for want of a payroll item, Kompass records that on their employee link and sends the item from then on, so the rejection happens once per person rather than once per entry.
What it sends is up to you:
- Set a default payroll wage item on the Config page. This covers everyone, and is all most companies need.
- Set a QBD payroll wage item on an individual Employee (User) Link to override the default for that person, for example where hourly and salaried staff are paid on different items.
Both are drop-downs read from your company file. If neither is set, the entry does not sync and the error tells you which employee it was and where to set the item.
If nobody in your company is paid from timesheet data, leave the default blank. It is only used for employees QuickBooks has told us need one.
Step 8: Payments from QuickBooks
With the Payments module on, Kompass regularly reads the payments received in QuickBooks and records them against the matching Kompass invoices. This is the one part of the integration that runs in the pull direction, and it requires the Invoices module.
What comes across:
- Each QuickBooks receive payment becomes a Kompass payment, allocated across the invoices it was applied to.
- Credit memos applied alongside a payment are applied to the same invoice in Kompass.
- An early-settlement discount is treated as part of the settlement, so the Kompass invoice clears exactly as it does in QuickBooks. The payment total is therefore the cash plus the discount, rather than the cash alone.
- Deleting a payment in QuickBooks removes it in Kompass and repaints the invoices it had settled.
Pulled payments are read-only in Kompass: the amount, the client and the overall totals cannot be edited, and the payment cannot be deleted. How a payment is split within a single invoice is not held by QuickBooks, so that remains editable.
Settings and timing
- Payment poll interval minutes (default 30) sets how often Kompass reads from QuickBooks. There is little point setting it lower than your Web Connector's own polling interval, since the data cannot be fresher than that.
- Payment last sync is how far the poll has got. The first poll starts from the beginning of the day you turn the module on, so switching it on does not pull in years of history. Set this field back to an earlier date to backfill; payments already synced are skipped.
- The Poll QBD payments now action runs a poll immediately, ignoring the interval.
Payments that could not be matched
A payment against a customer or invoice Kompass has no link for cannot be filed. It is recorded under Payment Links without a green tick, with a note explaining why, and is retried as links appear. Once the missing customer or invoice is linked, select the row and use the Re-pull selected payments from QBD action to bring it in.
One case the poll cannot see: a credit memo applied to an invoice in QuickBooks on its own, using Apply Credits with no cash involved, produces no payment record for Kompass to read. Apply that credit note in Kompass instead, or raise it in Kompass and let the sync carry it across.
If Something is Deleted in QuickBooks
QuickBooks does not notify Kompass when a record is deleted, so a deletion surfaces the next time Kompass tries to use it. What happens then depends on what was deleted, and nothing in Kompass is ever deleted to match:
- A customer or a job: re-created automatically on the next sync of that client or project.
- A time activity: re-created on the next sync of that diary entry.
- An invoice, credit memo or journal entry: not re-posted. Re-raising a document your bookkeeper deleted is not a decision the sync should make on its own, and the replacement would carry none of the payments or credits QuickBooks had applied to the original. The invoice reverts to unsynced in Kompass and its Sync checkbox unlocks, so you can push it again deliberately if that is what you want.
- An employee: re-matched by email address where possible, otherwise flagged for you to re-link.
- A service item or sales tax code: flagged for you to re-map. These are not re-created or substituted, because falling back to the default item would quietly post to a different income account.
Good to Know
- The QuickBooks machine needs to be on. Syncing happens through the Web Connector on the machine that hosts QuickBooks. While that machine is off or the Web Connector is not running, changes cannot be delivered; if a sync cannot complete, Kompass notifies the addresses under Notification recipients, and saving the record again once the connection is back retries the sync.
- Payments are the only thing pulled from QuickBooks. Everything else pushes from Kompass, and other changes made directly in QuickBooks are not read back.
- Attachments are not supported. QuickBooks Desktop's integration interface does not allow attachment upload for any vendor, so invoice files stay in Kompass.
- Single currency. All transactions are posted in the company file's base currency. Multi-currency company files are not supported.
- Name length. QuickBooks limits customer and job names to 41 characters; longer Kompass names are shortened, and colons are replaced with dashes (QuickBooks reserves the colon for its customer:job hierarchy).
- Billable and non-billable hours are not split. QuickBooks carries one billable status per time activity, so a diary entry syncs as a single activity marked billable or not, following its task.
If the connection stops working (for example after the QuickBooks machine is replaced or the Web Connector is removed), run the Check QBD connection health action to confirm, then repeat Step 2 to set the Web Connector up again, or contact Kompass support.