
Edit and close tasks in the task list
In this guide you will learn how to edit individual tasks, batch edit multiple tasks at once, and close tasks, along with the most common reasons why you might do each.
Editing a Single Task
Who can edit tasks?
Editing a task requires the Change Task permission (tasks.change_task ). Users without this permission will see the task in read-only mode.
Opening a task for editing
Navigate to Projects, open the relevant project, and go to the Operations tab. Click the task ID or name to open it. On the task detail page, click the Edit button to unlock the form.
Alternatively, from the Schedule view, clicking a task block opens an inline task dialog. If you have edit permission the dialog includes an edit button, or you can click Go to Task to open the full detail page.
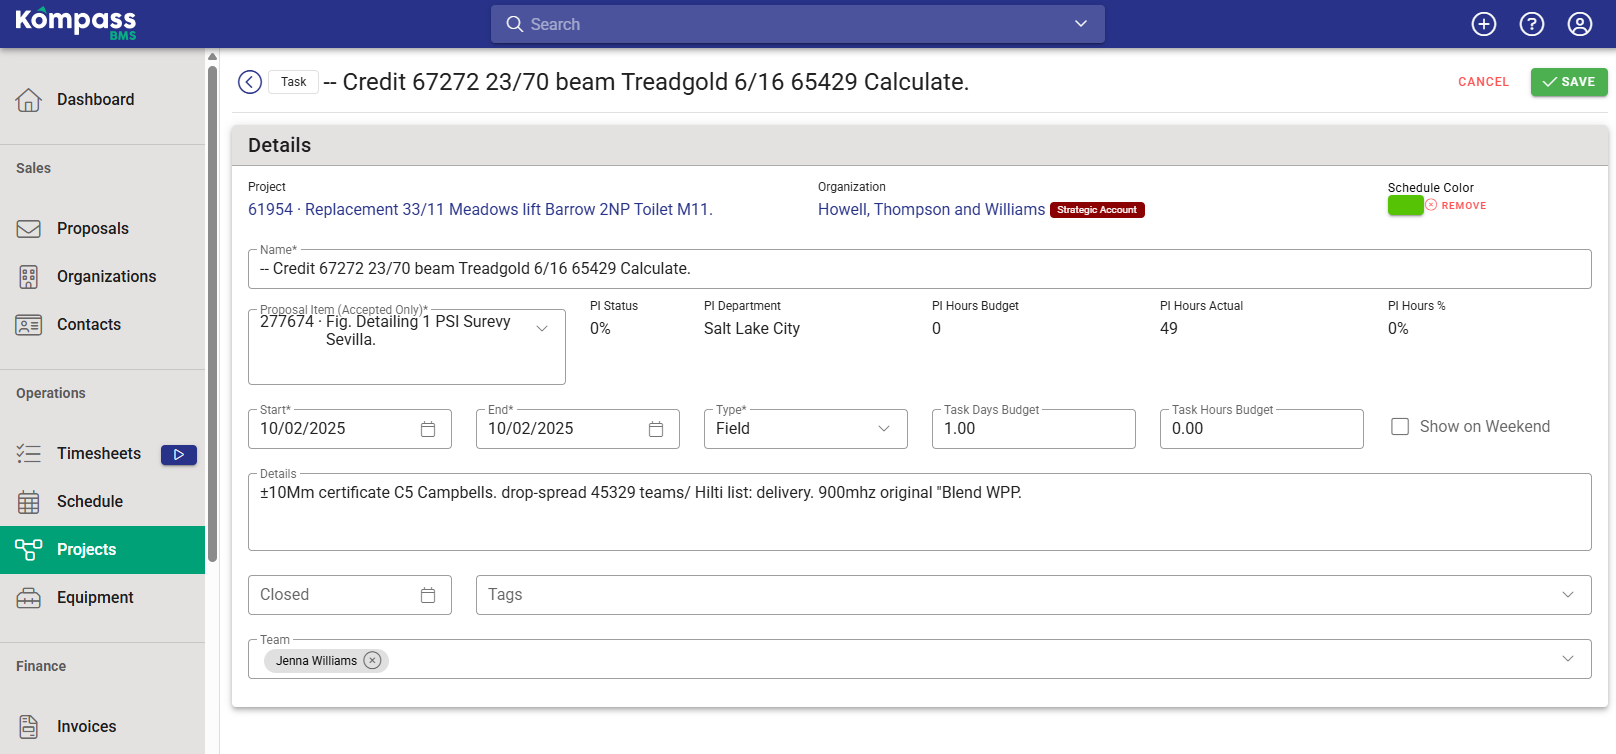
Available fields
| Field | Description | Notes |
|---|---|---|
| Name | The name of the task as it appears on the schedule and in timesheets. | Required. |
| Schedule Color | The color used to display the task block on the Schedule view. | Optional. Leave blank for the default color. |
| Proposal Item | The Proposal item this task's hours are recorded against. | Only accepted Proposal items are shown. Cannot be changed if the task has approved diary entries recorded against it (protected task shown with a padlock icon). |
| Start | The scheduled start date. | Required if an end date is set. Capped at the closed date. |
| End | The scheduled end date. | Required if a start date is set. Must be on or after the start date. |
| Type | The task type (e.g. Field, Office). | Required. |
| Days Budget | The planned number of days for the task. | Combined with Hours Budget to form the total budget. |
| Hours Budget | The planned number of hours for the task. | Combined with Days Budget. |
| Show at Weekend | Whether the task is displayed on weekend columns in the Schedule view. | Also controls whether recurring tasks skip weekends. |
| Details | A description visible to employees when logging time in their diary. |
|
| Closed | The date after which no further diary entries can be logged against this task. See the Closing Tasks chapter below. | Must be on or after the end date. If the task's Proposal item is already closed, a warning is shown and that date takes effect regardless. |
| Tags | Labels that can be used for filtering and reporting. |
|
| Team | The employees assigned to this task. | Determines who the task appears for in the Schedule and diary. |
Note: If you have the View Proposal Item permission, the form also shows read-only financial context from the Proposal item: the Proposal item's hours budget, hours actual, and percentage used. These are informational only and cannot be edited here.
Saving
Click Save when done. If Start date exceeds End date, End is automatically adjusted to match Start when you change the Start field.
Batch Editing Tasks
Batch editing allows you to apply changes to multiple tasks at once without opening each one individually. This is especially useful when tasks share a common property that needs updating. For example, rescheduling a group of tasks, reassigning a team, or closing a set of completed tasks all at once.
Who can batch edit?
Batch editing requires the Change Task permission (tasks.change_task ). Users without this permission will not see the Edit option when tasks are selected. The Proposal Item field within the batch edit dialog additionally requires that none of the selected tasks have approved diary entries recorded against them (see the Protected Tasks section below).
Step 1: Navigate to the project's Operations tab
Go to Projects, open the project you want to work on, and click the Operations tab. The task list is displayed here.
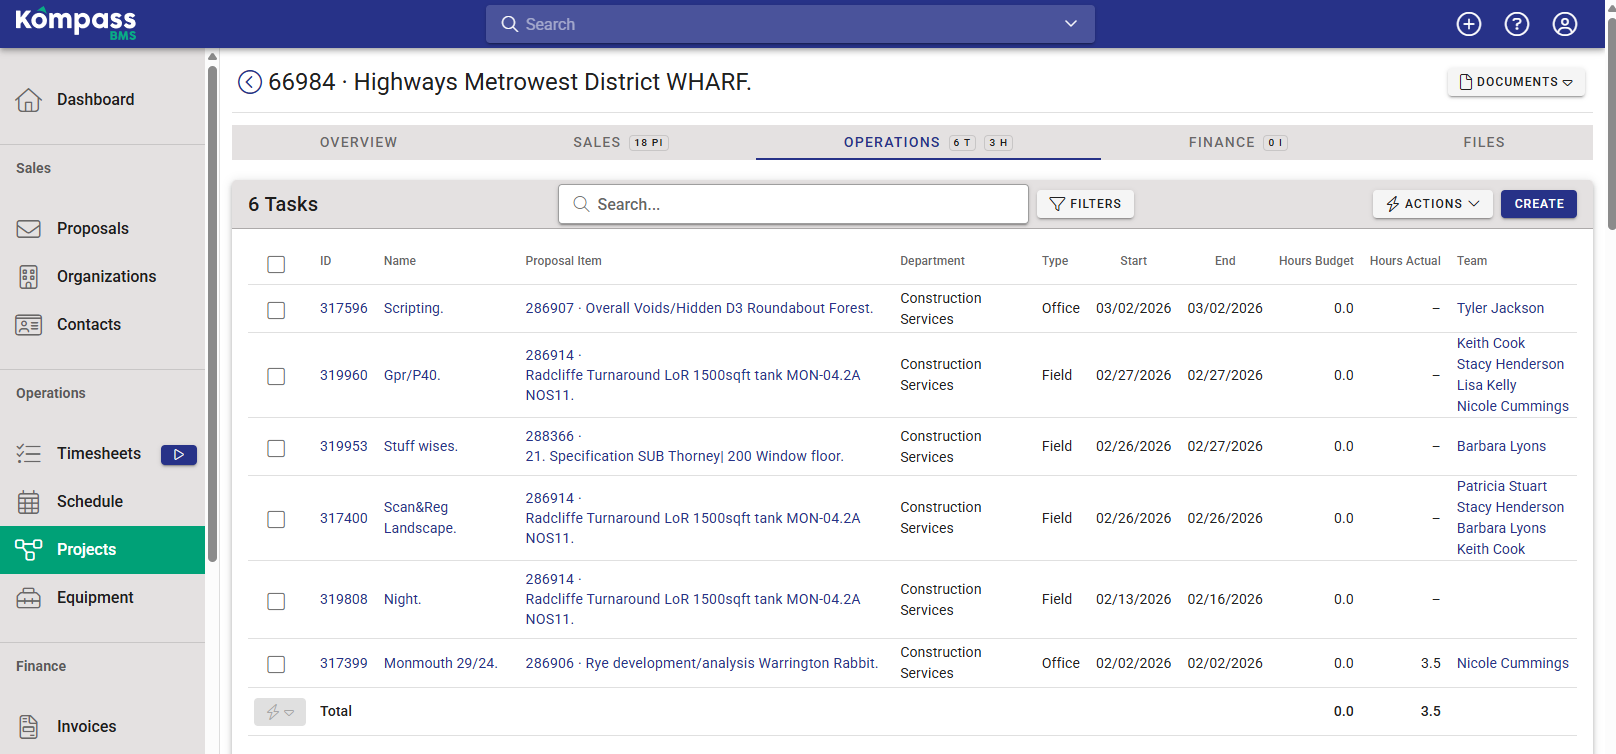
Step 2: Filter the task list (optional but recommended)
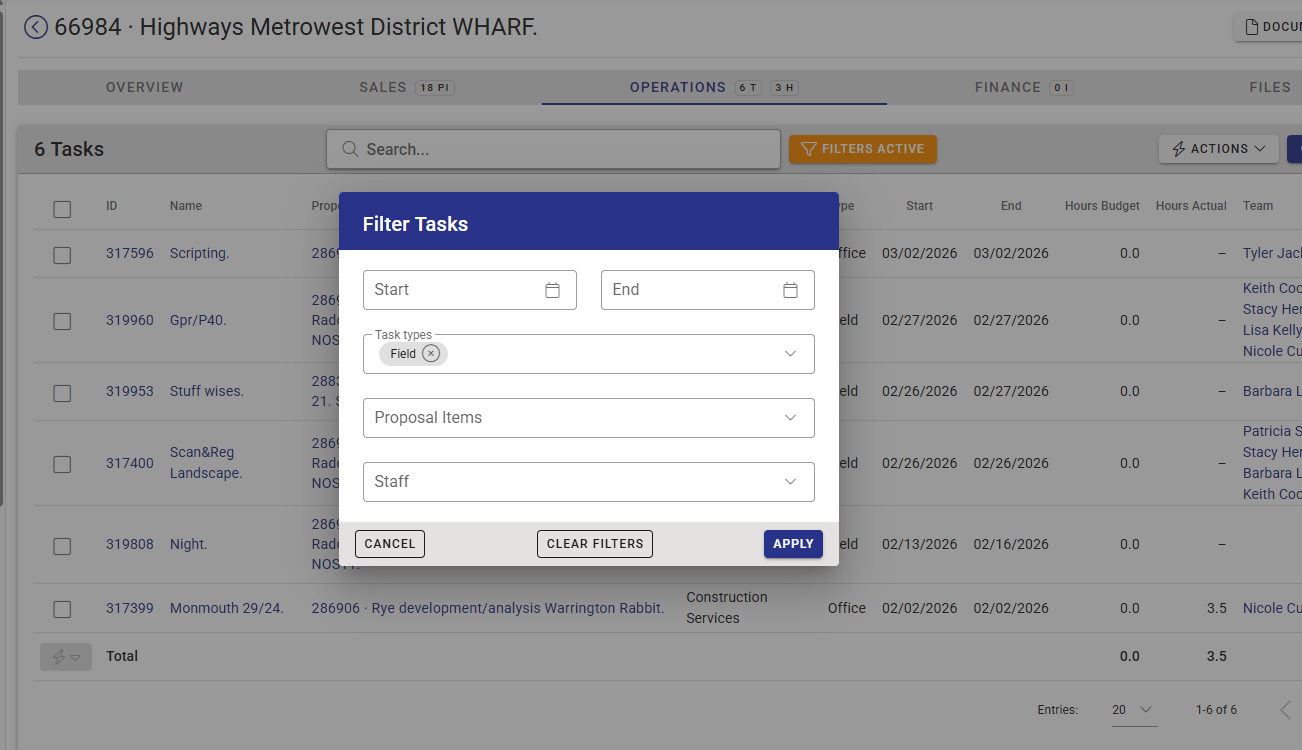
If you are working on a large project with many tasks, use the Filters button to narrow the list before selecting. Click Filters and set any combination of:
| Filter | What it does |
|---|---|
| Start / End | Show only tasks whose dates fall within the specified range. |
| Task types | Show only tasks of the selected type(s) (e.g. Field, Office). |
| Proposal Items | Show only tasks belonging to specific Proposal items. |
| Staff | Show only tasks that have specific team members assigned. |
Click Apply to activate the filters. The Filters button turns amber when any filter is active as a visual reminder.
Note: Your filter selections are saved automatically per project. If you return to the project later and tasks appear to be missing, check whether a filter is still active.
Step 3: Select the tasks to edit
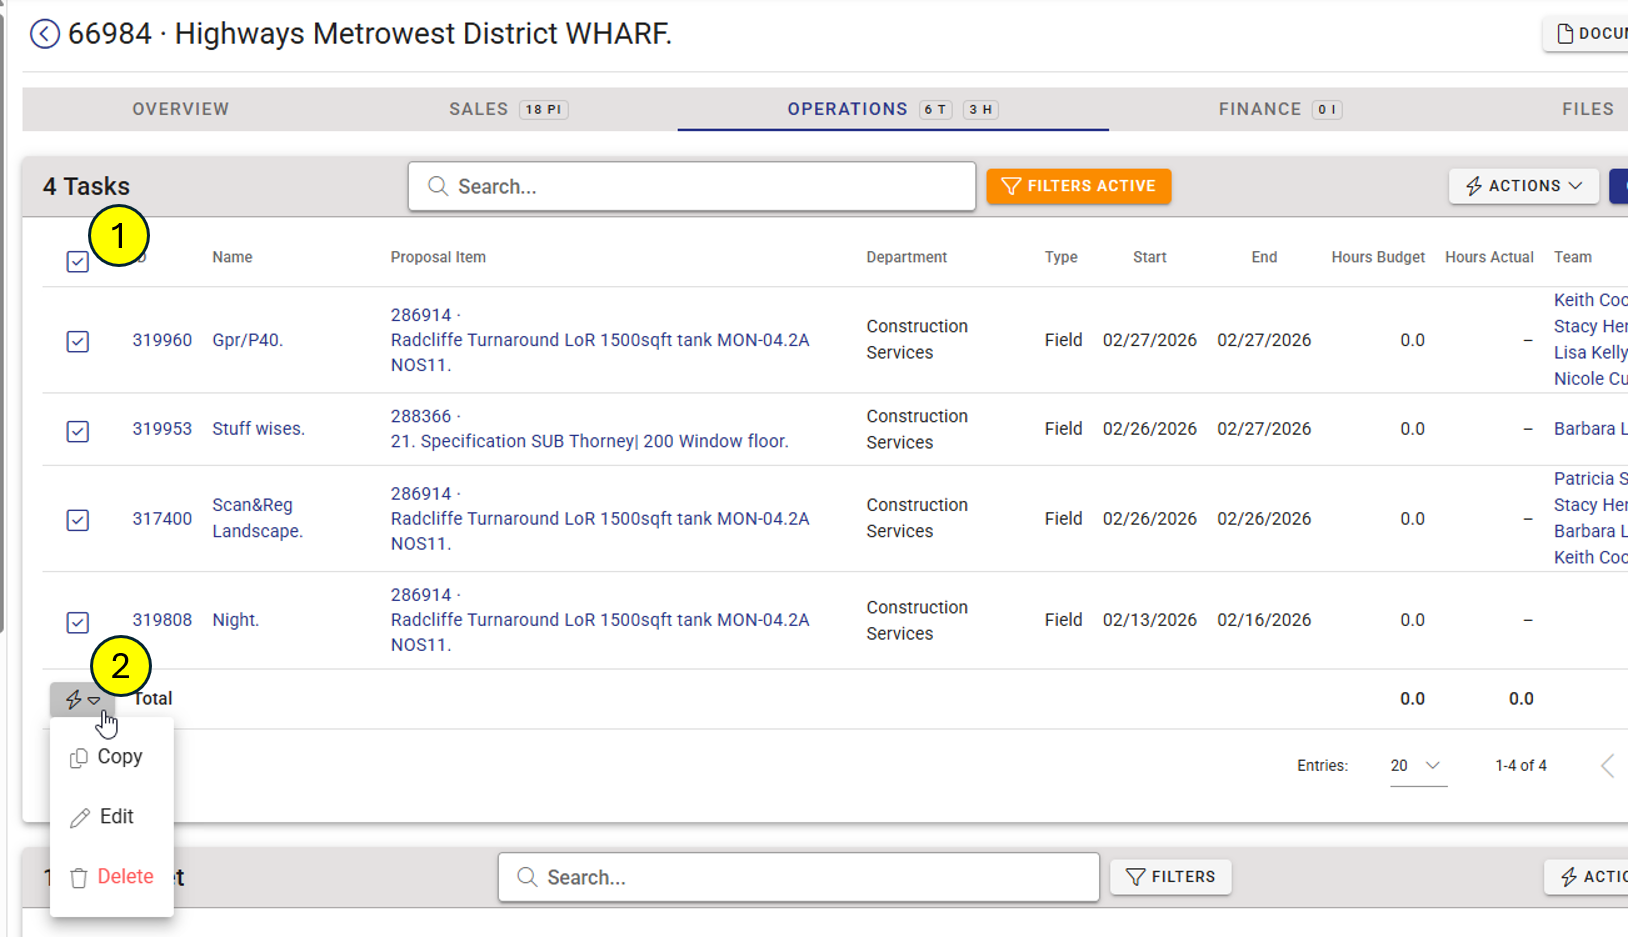
Tick the checkbox in the left column next to each task you want to include. After applying filters you can select all visible tasks using the checkbox in the header row.
Once at least one task is selected, a selection toolbar appears above the task list showing the available batch actions: Copy, Edit, and Delete.
Step 4: Open the batch edit dialog
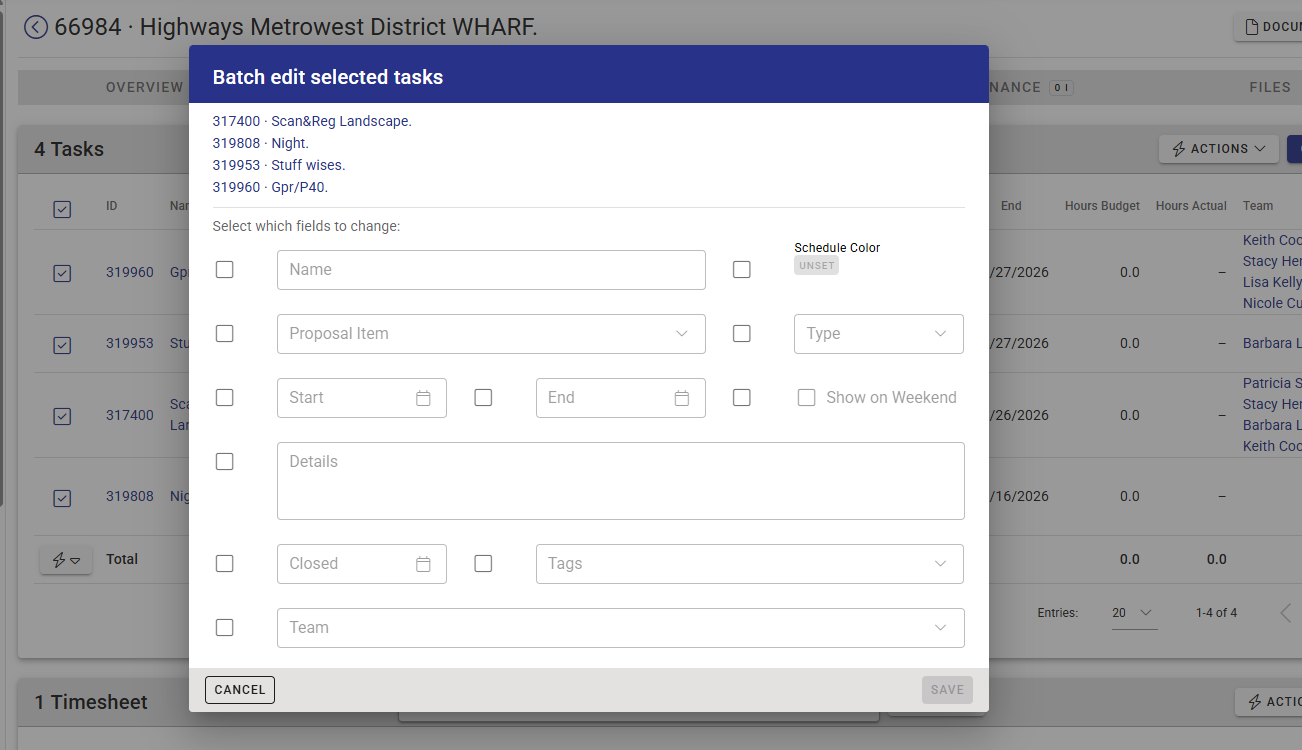
In the selection toolbar, click Edit. The Batch edit selected tasks dialog opens.
At the top of the dialog you will see a linked list of all the tasks you have selected (ID and name). You can click any task name to open it in a new tab for reference without closing the dialog.
Step 5: Choose which fields to change
The dialog presents all available fields. Each field has a checkbox on its left. A field is only included in the save when its checkbox is ticked; unticked fields are ignored entirely, leaving the existing value on each task unchanged.
This opt-in model means you can safely open the dialog, tick only the fields you want to change, and save without accidentally overwriting values you intended to leave alone.
The available fields are:
| Field | Notes |
|---|---|
| Name | Replaces the name on every selected task with the value you enter. Use with care, this sets the same name on all tasks. |
| Schedule Color | Sets the color used to display the task on the Schedule view. Leave blank to clear the color on all selected tasks. |
| Proposal Item | Reassigns all selected tasks to a different Proposal item within the same project. Only accepted Proposal items are shown. Disabled if any selected task has approved diary entries recorded against it. See Protected Tasks below. |
| Type | Changes the task type (e.g. from Office to Field) across all selected tasks. |
| Start | Sets a new start date. Clearing the field removes the start date from all selected tasks. |
| End | Sets a new end date. Must be on or after the start date. |
| Show at Weekend | Toggles whether the task is displayed on weekend columns in the Schedule view. |
| Details | Replaces the details/description text on all selected tasks. |
| Closed | Sets the closed date. Clear the field to reopen tasks. See the Closing Tasks chapter below for full details. |
| Tags | Replaces the tags on all selected tasks. Existing tags are overwritten, they are not merged with existing ones. |
| Team | Replaces the assigned team on all selected tasks. All selected tasks will end up with exactly the team you specify. To remove all team members, tick the checkbox and leave the field empty. |
Step 6: Save
Once you have ticked at least one field and entered the desired values, the Save button becomes active. Click Save to apply the changes. Kompass updates all selected tasks simultaneously and refreshes the task list when complete.
Important: The save cannot be undone from the UI. Double-check your selections before saving, particularly for destructive changes like clearing team members or overwriting task names.
Protected Tasks: When the Proposal Item Field is Unavailable
A task is protected when at least one approved diary entry has been recorded against it. Protected tasks are shown with a padlock icon next to their ID in the task list.
When your selection includes one or more protected tasks and you open the batch edit dialog, the Proposal Item field will be replaced by a message explaining that it cannot be changed because diary entries have been recorded. All other fields remain editable.
To change the Proposal Item on a protected task, the relevant diary entries would first need to be unapproved or removed, typically an administrator-level action.
Batch Copying and Deleting
The same selection toolbar also provides two other batch actions:
Copy: Creates a duplicate of each selected task. Copied tasks are prefixed with COPY - in their name, have their closed date cleared, and are detached from any recurrence series. Requires the Add Task permission and is disabled when the project is locked.
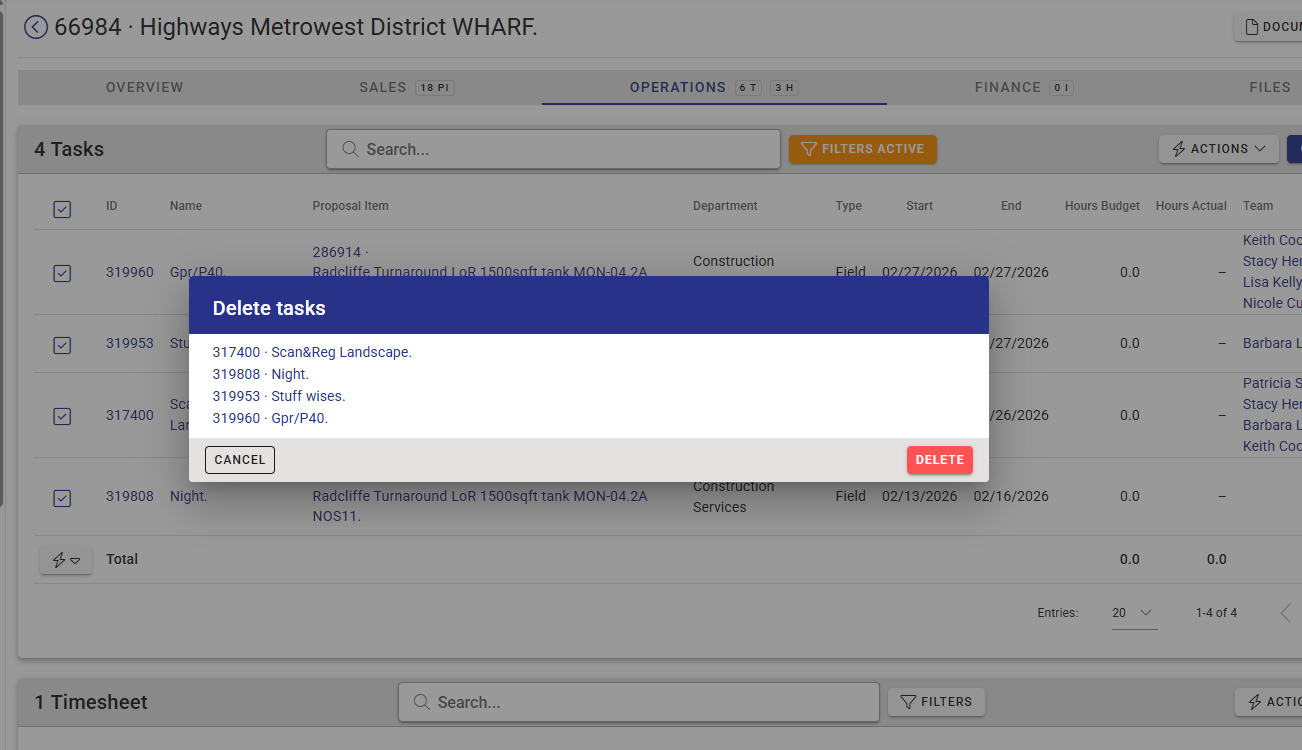
Delete: Permanently removes all selected tasks. A confirmation dialog is shown before deletion proceeds. Tasks that are protected (have approved diary entries) cannot be deleted, the Delete button will be disabled with a hint explaining why. Deletion is also disabled when the project is locked.
Closing Tasks
Why close tasks?
Some projects run for weeks, months, or even years and accumulate a large number of tasks. This is normally fine, but there are two common reasons to close tasks once they are no longer needed:
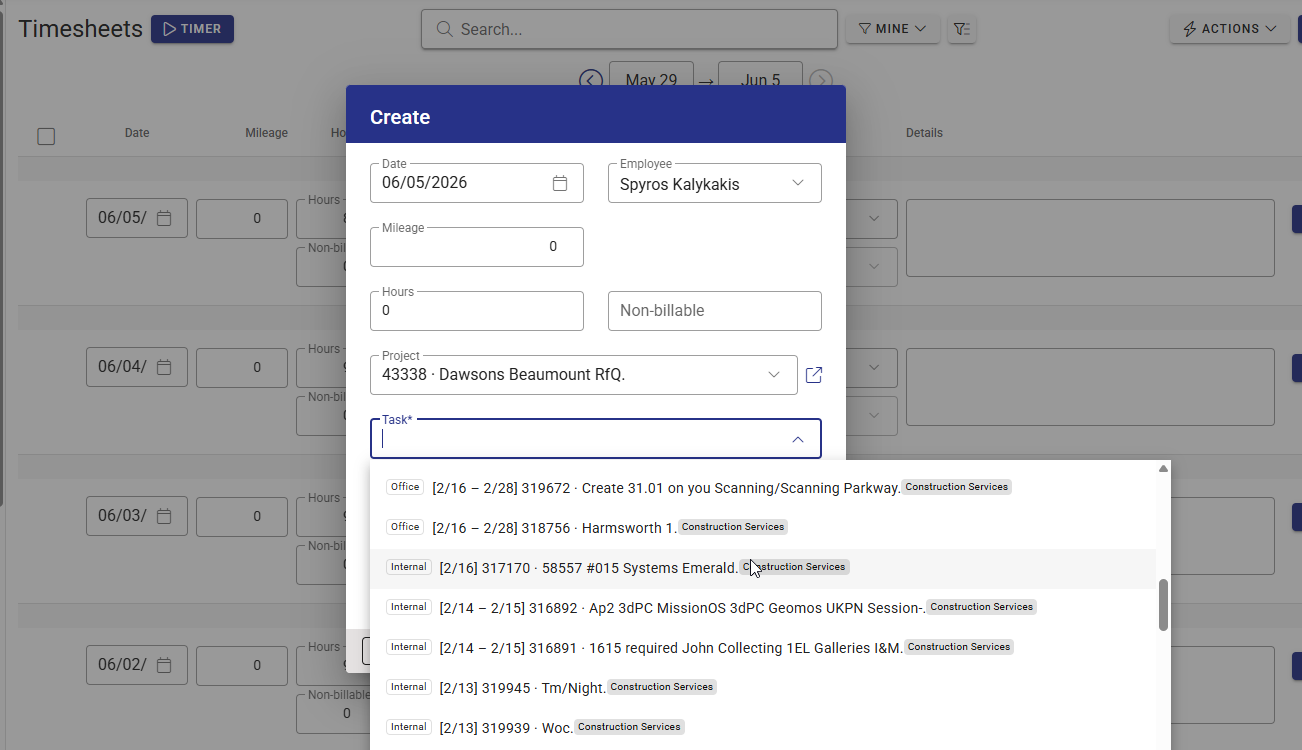
1. Reducing clutter in timesheets. When employees log time in their diary, they must select a project and task. A long list of active tasks, as shown in the image below, can be confusing. Closing tasks that are no longer relevant removes them from the diary task picker.
2. Preventing further hours being logged. If a Proposal item has run out of budget or has outdated cost rates, closing its tasks acts as a hard cutoff, no diary entries can be recorded against a task after its closed date, even if the task still appears in a search.
How the closed date works
Setting a Closed date on a task means:
- Employees cannot log diary entries against that task for any date on or after the closed date.
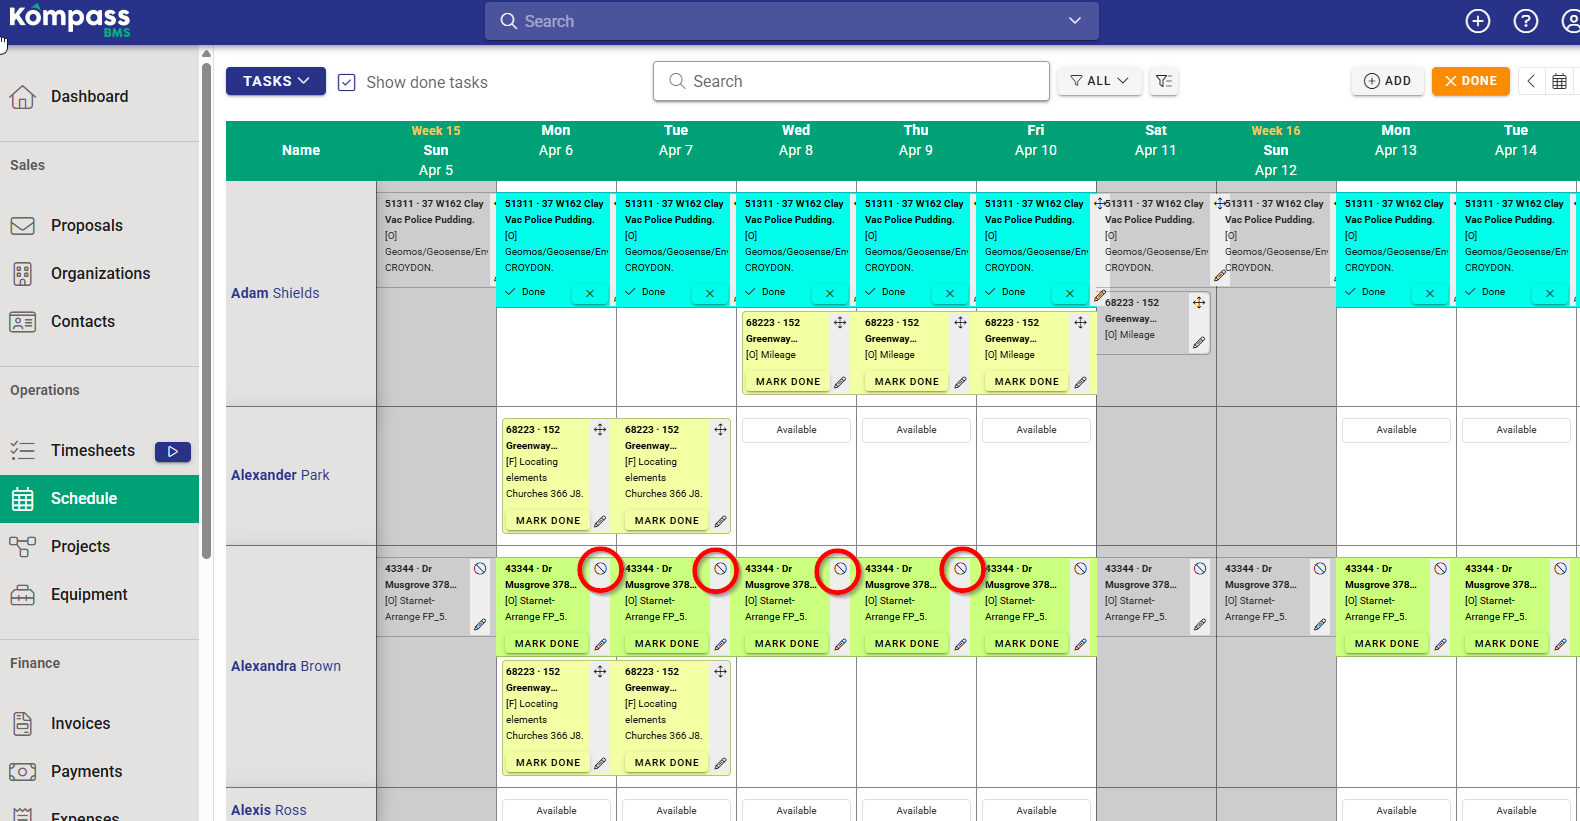
- On the Schedule view, the task block shows a ban icon (⊘) instead of the drag handle, meaning it cannot be moved to a different user or date.
- The quick-edit dialog on the schedule can still be opened for a closed task, but the Save button is disabled, no changes can be made via the schedule.
- The task remains visible in the project's Operations tab and in reports.
Important: The effective closed date is the earlier of the task's own closed date and its Proposal item's closed date. If a Proposal item is closed, all tasks under it become effectively closed regardless of whether individual tasks have a closed date set. When viewing a task whose Proposal item is already closed, a warning is shown in the Closed field.
How to close tasks
To close one or more tasks, follow the steps in either the Editing a Single Task or Batch Editing Tasks chapters above and set a value in the Closed field.
The closed date should typically be set to today or a past date to take immediate effect, or a future date if you want tasks to remain open for a defined period and then close automatically.
Reopening tasks
To reopen a closed task, edit the task and clear the Closed field (click the × on the date). The task will immediately become available again in timesheets for dates after today, and the drag handle will be restored on the Schedule view.
Note that if the task's Proposal item is closed, clearing the task-level closed date will not reopen it, you would also need to reopen or remove the closed date on the Proposal item itself.